Visualizzazione post con etichetta repair. Mostra tutti i post

sabato 5 febbraio 2022

Minolta Hi-Matic 7s II repair

Minolta Hi-Matic. I bought this camera without knowing much, a film was still inside (but did notice too lately, so no found film images) and looked externally in good working order.

 The camera suffered from acid leakage from the battery compartment, the range finder was completely blocked and also opaque, the aperture blades always closed.

First I removed the top cover of the camera and then the whole range finder assembly (it comes easily of as a whole). The RF has a top cover which is glued on, I removed it. I cleaned it with avgas and then alcohol. I did not remove the mirrors, but cleaned from above, so it is not perfect: however it is acceptable and the mechanism is free again.
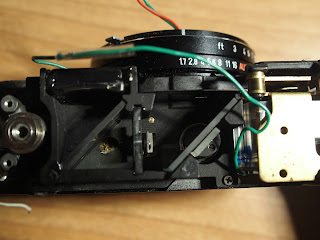
Much harder was trying to revitalize the Light Meter and the Aperture.

At the bottom, the acid leaked and completely ruined the wires, I removed everything and with great pain reconstructed the battery holder.

I had to tackle the lens.  I removed the front cover. It contains the cell, but also a mechanism with a ring that rotating regulates the light on the sensor coupled with the shutter speed.

The Sensor element (sealed CdS) has a small PCB and the wires were completely oxydated and corroded. I cannot tell if this is age damage or caused by vapours of the battery going through the lens.
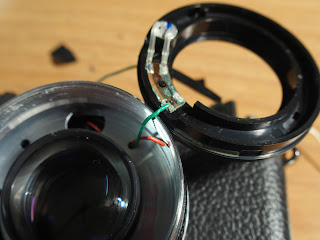
Harder was to get the Aperture. The front part of the lens can be unscrewed, it was very tight and had to use Pliers! I guess the metal stuck a little. Then I could not see how to proceed further and wished not to tackle the lens from the back. No oil was to be seen, but I cleaned and cleaned again with avgas and by miracle this started to move reliable. Fine!

Quite hard was to reconstruct the traces on the PCB. I used a copious amount of solder paste to remove oxydation and slowly proceeded with solder tin and fixed it.

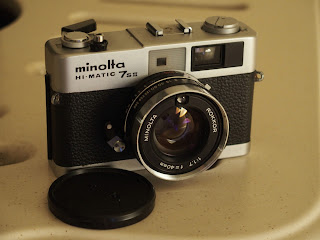
And, then everything reassembled, the compact camera with a very nice 40mm 1.7 lens is ready to go again.

domenica 11 novembre 2018

Minolta 50/1.7 AF Repair (updated)

Another post on a very common issue: sticky diaphgram blades.
From old Exakta lenses to Nikkor AF Zooms, apparently anyone gets there.

This time, the classic Minolta 50/1.7 has the issue, although in its AF version.

Dismounting AF lenses can be tricky, but in here everything seems fine, except the Iris. I want to avoid regreasing the helicoids because I haven't yet found a satisfactory Grease, even if I tried several! I will try unmounting as little as possible from the lens as possible to get to the Diaphgram Iris assembly.

We can work from the front, by unscrewing in sequence the cone with the name plate first, then removing 3 screws to remove the the front part with the retractable sun shade. Without these parts, the lens is still fully functional.

From the rear, we can remove the lens bayonet and put it aside and we see the picture like this:

AF Rokkor 50/1.7 from the back, mount removed (left)

The optical assembly is in the middle and has two guides, clearly seen top and bottom in this picture. Mark the helicoid for convenience and unscrew them
Now it is possible to unscrew the optical kernel to the back of the lens.
Getting it back will be a little tricky, since the infinite setting needs to remain. Even if I marked the helicoid, I needed a couple of attempts.

The hard part is done! The 50mm is a double-gauss type and it is easy to take it apart. Removing three screws enables to remove the front part and the same is for the back.

What remains is just the Aluminum barrel with the Iris mechanism inside. Now you can clean it by flushing or by opening it.

My first attempt of repair was done with a flush-clean: often this is enough if just a little oil is astray. However it worked for a couple of months, but then the blades stuck again. This means there was a lot of oil in the non-accessible mechanism (the ring that acts as governor for every pin), so a more drastic solution was needed: remove the blades with their governor ring.

The open diaphgram blades, the governor on top


Mounting everything back is relatively easily, except for getting the right screw thread and not damaging the delicate Aluminum thread when screwing it in.

Check the infinity focus.. and that the diaphgram is snappy again!

lunedì 6 novembre 2017

Ikoflex and Prontor SVS repair

The Ikoflex Ic had a stuck shutter, when I bought the camera, I thought it would have been just gummed up, because it has long been on the shelf. I sadly was proven wrong.

To access the shutter assembly, Both lenses need to be removed. The viewing lens comes out completely, while the taking lens detaches its front assembly. The rear part needs of it needs to be removed by accessing it from the back (open the back, remove the light baffle).
Then, by removing the handles of the f-stop, removing the decorative name plate, the whole cover can be removed.
 
The Ikoflex once both lenses and the front panel are removed looks like this:


The Prontor SVS can be easily opened and separated in its essential components. Be careful with the Sync cable, it is tricky since it is tight and secured on the back with a screw.

At first, I tried flushing the Shutter clean (I use Esane, AvGas), but it would still not reliably run.

The Prontor SVS has two delay mechanisms: one is the actual timer for the shutter speeds, the other one is the delayed action of the self-timer which doubles as minimal delayed action when the the flash sync is set to M. X has no delay instead.
The retarders are ingeniously linked together and are cocked together, one of the inventions of the Prontor.

The Prontor without the two retarders:


The flash and self-timer mechanism:


This is the actual shutter timer:


The shutter timer is damaged, the small extension that can be seen top-right is bent. Most probably the shutter stuck and somebody forced the action. I suppose that some customer played with it on the shelf too hard.
However, even when I removed both timers, but even then the blades would stuck half open. While being wet it would work, but not when dry. The real problem though was not friction or dirt, but a slightly bent pin. An U-shaped part needs to be in the right position or the pin attached to the blades, which moves during the shutter action, remains stuck. However it also needs to be able to catch it. The amount is really minimal. Once "bent back" the shutter action moved freely.

Repairing the connecting pin on the timer mechanism was impossible: just trying to bend it back pried it apart. Most often repair-men exchange the whole piece, but alas, A. Gauthier is no more and spare parts are rare, I couldn't locate one. However a very similar Prontor SVS part was found as a donor, perhaps a different revision. The lever was compatible, I exchanged it in the timer.
Opening the timer is tricky and the risk of loosing or damaging the spring is high: I do not recommend doing it if not necessary. I would try to clean assembled.

Mounting all tiles back in the reverse order... and the Prontor worked again... and the Ikoflex is a faithful companion again.

So, remember, don't force shutters if they are stuck!

lunedì 15 dicembre 2014

Dompilan diaphragm repair

Meyer Optik Görlitz Domiplan was a quite nice 50m/f 2.8 compact and standard lens common in Exakta (especially for the Exa) and M42 (Praktica) mount.

I have two and both of them suffer from a sticky diaphragm (iris aperture) syndrome, like most of old lenses.

I read horror stories about this lens, people ruining it completely, declaring it unrepairable or so. I don't think it is any harder than other lenses I tried to repair, provided it is just stuck and not broken. When it gets stuck, the blades gum up very hard so trying to force it may cause the pin and leverages to break.

I find the lens quality quite nice, for being a triplet! Smooth colors, bokeh and only slight vignetting. I disagree with people calling this a bottle bottom glass or "Holga like"! I think people having bad experiences had badly serviced or broken lenses. See the examples below.


Start by removing the back-part, the bayonet. Then you can remove the barrel holding the lens. You do not need to remove the lens itself. Three screws and you get the parts seen in the picture below.

Remove all the blades carefully, put them on a paper towel.


Clean the blades with petrol, light gas, lighter fluid, what you prefer. They are made out of steel, be careful not to knick them and not to damage their drive pins.

If you had a serious oil problem, then the lens surfaces might be hazy and you need to clean those too.

The blades need to be inserted one over the other, like a spiral stair case. The most difficult are the last and the butlast, because the nose needs to go "below" the first, it can be seen well in the picture below.
Try not to touch the blades with greasy fingers. Once all blades are in, you need to slightly close them before putting the cover ring and screwing it down. To do that, gently actuate the leverage, as shown in the following picture. The three screw both fix the upper part to the diaphragm ring, but also fix the whole assembly to the lens barre.


Once closed and screwed down, the actuator lever should already work smoothly. Don't close it too much or it will stick.

Remount the rest of the lens with care. Take care of the two opposed springs that go into the barrel. Take care that the f-stop-ring is aligned properly.
The Exakta version is easy to remount, the M42 version has a different linkage to the bin, be sure to mount it in the correct open position!

Once everything is reassembled, use the lens! In my experience it is a light, compact lens which works fine with color and b&w films. It works best around 8-11, but 5.6 is already quite fine. Of course at 2.8 it vignettes a bit, but it remains reasonably sharp in the middle,

Here a photo taken with my Exa and the Domiplan:


Here again, wide-open at 2.8:


domenica 24 agosto 2014

Canon AE-1 shutter repair

My Canon AE-1 suddenly did not expose at all: all shutter times "sounded" the same: a check showed the shutter was not opening at all, even "B".

There are several forum posts on the internet which report "magnet" problems usually related to random malfunction or to the camera firing while loading and they show you how to clean an electro-magnet.

My problem was different, but I decided to take a closer look.

The Canon AE-1 has two electro-magnets, one for the first curtain and on e for the second curtain.
If the first curtain is not correctly retained, the camera will fire too early or other problems I can only imagine. If the second curtain is not retained, there is no time delay and the camera makes the shortest possible time. It is not even 1/1000", in my case it was black, the second curtain catches up the first and the shutter is dark. It is the bigger magnet, protected by a plastic case.

Cleaning the second-curtain electro-magnet is easy; nothing to open, just gently sweep it off with alcohol without damaging the wires and solders. This magnet has no protection at all and evidently can get dirty easier.

Once cleaned, by trusty canon worked flawlessly again!

It is worth checking that the coils are still fine. In my case the first curtain electro-magnet had an in-circuit resistance of about 100 Ohm. The second curtain magnet has an in-circuit resistance of about 200 Ohm instead.

First curtain magnet

Second curtain magnet